Block Devices and CloudStack
You may use Ceph Block Device images with CloudStack 4.0 and higher through
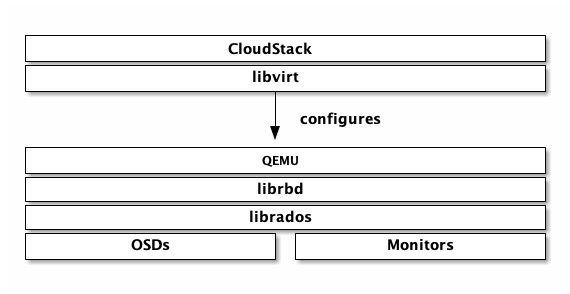
libvirt, which configures the QEMU interface to librbd. Ceph stripes
block device images as objects across the cluster, which means that large Ceph
Block Device images have better performance than a standalone server!
To use Ceph Block Devices with CloudStack 4.0 and higher, you must install QEMU,
libvirt, and CloudStack first. We recommend using a separate physical host
for your CloudStack installation. CloudStack recommends a minimum of 4GB of RAM
and a dual-core processor, but more CPU and RAM will perform better. The
following diagram depicts the CloudStack/Ceph technology stack.

Important
To use Ceph Block Devices with CloudStack, you must have access to a running Ceph Storage Cluster.
CloudStack integrates with Ceph’s block devices to provide CloudStack with a back end for CloudStack’s Primary Storage. The instructions below detail the setup for CloudStack Primary Storage.
Note
We recommend installing with Ubuntu 14.04 or later so that you can use package installation instead of having to compile libvirt from source.
Installing and configuring QEMU for use with CloudStack doesn’t require any
special handling. Ensure that you have a running Ceph Storage Cluster. Install
QEMU and configure it for use with Ceph; then, install libvirt version
0.9.13 or higher (you may need to compile from source) and ensure it is running
with Ceph.
Note
Ubuntu 14.04 and CentOS 7.2 will have libvirt with RBD storage
pool support enabled by default.
Create a Pool
By default, Ceph block devices use the rbd pool. Create a pool for
CloudStack NFS Primary Storage. Ensure your Ceph cluster is running, then create
the pool.
ceph osd pool create cloudstack
See Create a Pool for details on specifying the number of placement groups for your pools, and Placement Groups for details on the number of placement groups you should set for your pools.
Create a Ceph User
To access the Ceph cluster we require a Ceph user which has the correct
credentials to access the cloudstack pool we just created. Although we could
use client.admin for this, it’s recommended to create a user with only
access to the cloudstack pool.
ceph auth get-or-create client.cloudstack mon 'allow r' osd 'allow class-read object_prefix rbd_children, allow rwx pool=cloudstack'
Use the information returned by the command in the next step when adding the Primary Storage.
See User Management for additional details.
Add Primary Storage
To add primary storage, refer to Add Primary Storage (4.2.0) to add a Ceph block device, the steps include:
Log in to the CloudStack UI.
Click Infrastructure on the left side navigation bar.
Select the Zone you want to use for Primary Storage.
Click the Compute tab.
Select View All on the Primary Storage node in the diagram.
Click Add Primary Storage.
Follow the CloudStack instructions.
For Protocol, select
RBD.Add cluster information (cephx is supported). Note: Do not include the
client.part of the user.Add
rbdas a tag.
Create a Disk Offering
To create a new disk offering, refer to Create a New Disk Offering (4.2.0).
Create a disk offering so that it matches the rbd tag.
The StoragePoolAllocator will choose the rbd
pool when searching for a suitable storage pool. If the disk offering doesn’t
match the rbd tag, the StoragePoolAllocator may select the pool you
created (e.g., cloudstack).
Limitations
CloudStack will only bind to one monitor (You can however create a Round Robin DNS record over multiple monitors)
